R-Type
The R-Type is an Epitech Project, but also a known videogame !
This project is our interpretation of the game, modulated as a Bullet-Hell.
We made it using C++, the Raylib graphical library, and that’s pretty much it !
We implement a fully from-scratch & personalized network library, featuring nice packet abstraction.
We also have a custom ECS implementation, great for showing a loooot of bullets on the screen !
Play with your friends !

Documentation
Want to contribute ?
Want to play ?
Want to observe ?
See the documentation here.
How to get started
You need to have gcc-c++, make & cmake, and git installed. That is it !
make release
Three binaries will then be created :
r-type_client, graphical client.r-type_server, server.r-type_rcon, rcon command cli tool.
./r-type_client IP PORT [-d]./r-type_server -p PORT [-t TICKSPEED] [-d]./r-type_rcon IP PORT
Example:./r-type_client gillier.dev 4242
If you are running a server or rcon, you can setup the RCON passkey in the rtype.cfg file.
By default it will be randomly generated.
Authors
- Mani Gillier
- Kaitomomota
- Hugo Poggetti
- Maxime Huet
Build project
Dependencies
- make
- cmake => 3.15
- c++20 compiler
- git
- Raylib dependencies
- PThreads (POSIX threads)
Package manager
Packages used
- raylib v5.5
- libconfig
- sqlitecpp
- zlib
Build
# build release
make release

# build debug version
make debug
Technical choices
Chosen Language
We chose C++ because for a multiplayer game, we needed very good performance. The low-level control over memory allows us to optimize our game as much as possible.
Compared to Java, C# or Zig, we lose a bit of development time but it’s worth it thanks to the time we gain on execution speed and resource control.
Chosen Graphical Library
For our graphical library, we chose Raylib.
It offers multiple advantages compared to other libraries:
- SFML
- The raylib offers a higher level management of operations, with a lot of underlying global variables, offering nice and straightforward function calls.
- The SFML, although having the nice advantage of being adapted to Object Oriented Programming, tends to be more difficult to use because of the need to keep track of all variables created. It may be preferable to have the variables in hand, but in our case with the ECS and state machine, we chose to have hidden variables.
- SDL
- The SDL is a low-level graphical library. We did not wanted to go too deep in that rabbit hole, and we stuck to the Raylib, offering higher level implementation.
- Direct OpenGl calls
- I’m not even gonna explain why we did not chose that path.
The Raylib is a really good graphical library, but we may encounter some problem with it, namely :
- It is not really adapted to Object Oriented Programming.
Indeed, it is not at all constructed with classes, and rely solely on direct calls to global funtions
Algorithms and Data Structures
ECS (Entity Component System)
The ECS was a bit of an unusual choice but logical for us. Compared to a classic object-oriented architecture with inheritance, the ECS organizes data contiguously in memory, which optimizes the CPU cache on both server and client side.
Concretely, instead of having “Player” or “Enemy” objects that are subclasses, we group all components of the same type together.
Result: when we update positions or Health, the iteration is much faster. For a game with many simultaneous entities, it makes a huge difference.
RéseauType (custom)
This is our most strongest yet assumed choice. Instead of using an existing cross-platform library, we developed our own network library. Why?
- We know how it works. If a bug appears, we can fix it ourselves without depending on an external community.
- Generic libraries handle many cases we don’t need. Our protocol is tailored for our needs - position packets, input packets, etc.
- By controlling the protocol, we can implement packets specific to our game, whereas with an existing library we would have had to adapt to its functioning.
The fact that we have our own network library allows us to integrate these checks directly into the protocol rather than adding them on top.
Storage
RéseauType uses binary serialization for packet transmission.
This section compares different serialization methods.
Binary Serialization (Our approach)
Binary serialization converts packet data into bytes.
Packets are not stored permanently. They exist only during transmission between client and server.
It is fast and deterministic.
Both the client and server know exactly how to read and write packet data.
There is no parsing overhead, which makes it reliable for real-time communication.
However, changing packet structure requires updating both client and server code.
The binary format is also difficult to debug since it is not human-readable. (Although RéseauType comes with a Logger to make debugging easy !)
Why RéseauType Uses Binary Serialization
RéseauType prioritizes speed and bandwidth usage
Binary serialization provides the fastest transmission and smallest packet size, which is critical for real-time multiplayer games where latency matters.
JSON or Protocol Buffers are not optimal for real-time games where performance is the priority.
Security
The only security challenge of the project is dealing with client output and preventing cheating. Clients can be modified or replaced with malicious programs that send fake data to gain unfair advantages.
Server Authority
The server has authority on everything. It does not trust the client at any point.
The client only sends its inputs.
he server calculates the player’s position, health, score, and all game state.
The client does not determine its own position or any game logic.
This prevents clients from sending false position data or modifying their own stats.
Even if a cheater modifies their client, they can only send inputs, not results.
Connection Validation
A client is disconnected when it does not connect properly using the RéseauType Client.
Although this connection method can be mimicked by a custom client, it does not give any advantage over using the RéseauType Client.
This prevents random programs from spamming the server without proper authentication.
Packet Validation
Our system can disconnect a user based on the data received in a packet.
An anti-cheat system can easily be implemented by adding packet executors that detect suspicious behavior.
The server kicks off a player when it receives an unknown packet ID. It only accepts registered packets.
Data Integrity
All packets are serialized in binary with variadic sizes. The server validates packet size before processing. If a packet is malformed, it disconnects the client.
Further Security Axis
DDoS Attacks
RéseauType does not currently implement rate limiting or IP blocking. A malicious client could spam packets to overload the server
Rate limiting can be added to limit the number of packets per second per client.
Man-in-the-Middle Attacks
RéseauType does not encrypt packets. An attacker on the same network could intercept and read packets, or modify them in transit
Adding encryption (TLS for TCP, DTLS for UDP) could prevent this and could be added.
Client Documentation
Summary
The client represent the playable part of the project.
A client must connect to a given running server to work.
It has a Graphical User Interface to allow a human to play the game.
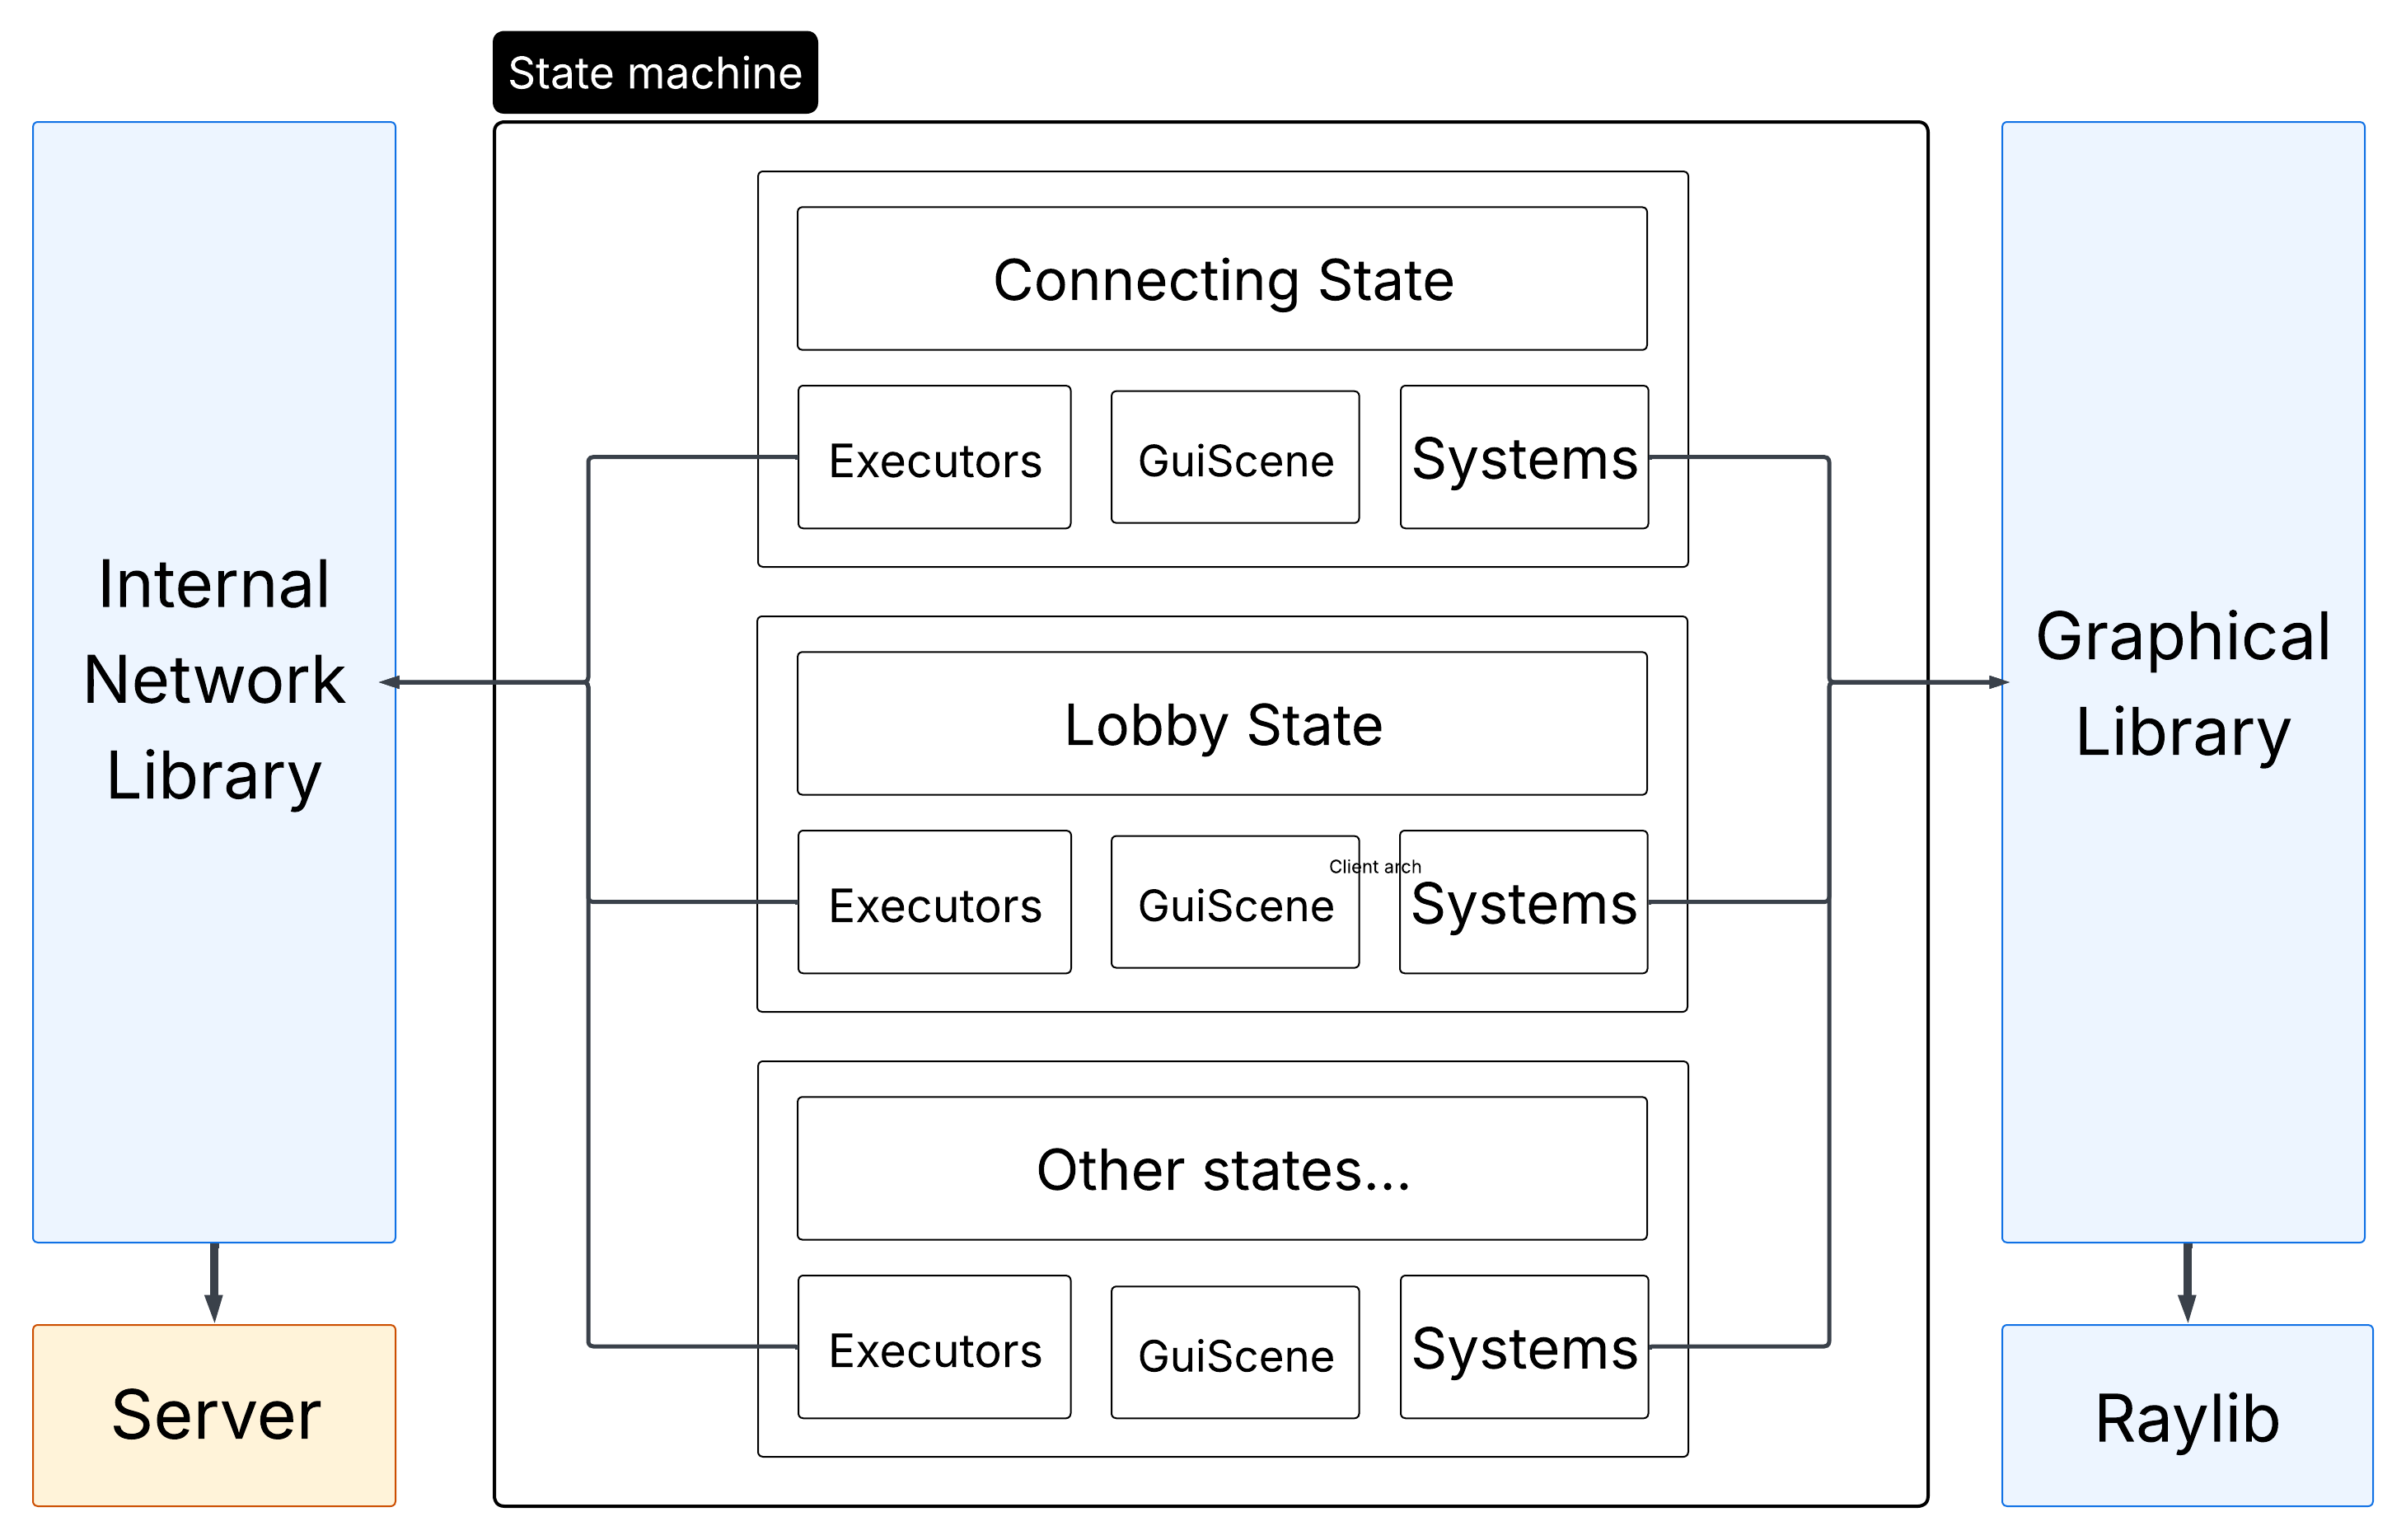
Architecture
The client is composed of two parts:
- The State Machine
This is where all of the logic and rendering happen. - The Network
This is where all communications with the server happen.
The client is not responsible to determine anything except for user inputs.
The position of the player is even determined by the server itself.
State Machine
The client works with a state machine.
It must be initialized with a base state.
If a state decides it needs to switch to another state, it should call the switch_state method with the new state.
Every state need to implement an init_systems and init_entities method.
As the name suggests, they allow the init of systems and entities.
You should also reset the registry if needed, as well as the network executors.
An end state exists, and if switched to it, the program will stop. It can be used to end the game.
A state can have a gl::GuiScene. It should be instanciated in the init_systems call.
This gui scene will be rendered after the main registry renderers are called.
The base states are the following:
Connection state
Inside the connection state, the client is preparing the connections with the server.
It first connect with a TCP socket, and then setups a UDP connection (and this is where the loading time arise).
It is separated from the rest to forbid interaction while this crucial step is still processing.
The client also loads any images into GPU memory while this step is processing.
The client is then sent to the login page
Login state
The client need to login to the server before doing anything.
This is done in the login state.
He can choose between login and registering a new account.
Error messages are shown on top of the login/register boxes.
After login, the client is sent to the main menu;
Menu state
Inside the main menu, the client can choose to:
- Access the settings page.
- Join a random game, create one, see informations.
Inside the menu, the player can join lobbies.
He can choose between creating or joining a random lobby, creating a private one or joining a specific lobby.
He can also see the scoreboard of the game, with the top 10 players on the server.
Settings state
Here you can choose your keybinds, or toggle the red-daltonian filter.
You can go back to the main menu from there.
Lobby state
Before a game, you are sent to a lobby.
This is where you wait for your friends to connect to join the game together.
Inside the lobby, you have the possibility to request the start of the game, and force every player in the lobby to switch to the game state.
You can also chat with you friends in the lobby.
You can set the game settings, such as difficulty and number of lives.
When the game starts, you are sent in the game screen
Game state
Finally, the real state. The one where you can play.
Here you have the possibility to see other players, enemies, bullets and, of course, to interact and play the game with you controls.
You also have access to the chat.
You see the list of players and your number of heart remaining.
At the end, you are propulsed in the end states.
Win Lost state
The end screens !
You see either that you won, or that you lost.
After that you can go back to the main menu to see the scoreboard !
Composition of each state
We are using an Entity Component System to make the game work. Both rendering and logic parts are using this ECS.
Given that, every state has it’s own separated entities, components and systems.
For example, the game state has a system dedicated to showing a bullet on the screen, whilst the connecting state really don’t have any bullets !
Network
The client utilizes network in an extensive manner, as it needs it for almost everything !
Indeed, almost nothing is determined by the client itself for now, and it is uncapable of even computing the position of the player.
Thus, it needs to receive those informations from the server.
We can differentiate three kind of communication between the server and the client :
- Mandatory connection communications
This include the authentification of the UDP socket for example. - Ponctual events
For example, when a player is killed, or an enemy spawns. - Continuous datastream
For example, player and enemy positions, player inputs.
The architecture with executors that totally abstracts differentiation between types of packet make it fairly easy to understand how to implement a reaction to a given packet.
Managers
- Client Manager
The client itself is manager through aClientManager.
This class creates all the necessary subclasses and managers to launch the game, connect to the server and close everything without memory leaks.
It hosts the principal game loop and the state machine, and calls the subsequent update and render methods from a given state. It is responsible for the state change, although determined by the state themselves. - Network Manager
The network manager inits the network thread. Inside this thread runs the network main loop, in change of calling the network library methods to connect to the server, poll events and send them.
This manager also handles request of deconnections.
Graphical library
For our graphical library, we chose Raylib.
It offers multiple advantages compared to other libraries:
- SFML
- The raylib offers a higher level management of operations, with a lot of underlying global variables, offering nice and straightforward function calls.
- The SFML, although having the nice advantage of being adapted to Object Oriented Programming, tends to be more difficult to use because of the need to keep track of all variables created. It may be preferable to have the variables in hand, but in our case with the ECS and state machine, we chose to have hidden variables.
- SDL
- The SDL is a low-level graphical library. We did not wanted to go too deep in that rabbit hole, and we stuck to the Raylib, offering higher level implementation.
- Direct OpenGl calls
- I’m not even gonna explain why we did not chose that path.
The Raylib is a really good graphical library, but we may encounter some problem with it, namely :
- It is not really adapted to Object Oriented Programming.
Indeed, it is not at all constructed with classes, and rely solely on direct calls to global funtions.
We abstracted it away in our own graphical library definition.
Diagrams
Client architecture diagram
R-Type Server Documentation
Table of Contents
- Introduction
- Quick Start
- General Architecture
- Connection Management
- Lobby System
- Game Loop
- Entity Component System (ECS)
- Threading Model
- Configuration
- Administration (RCON)
- Login/Registration
- Error Handling
- Performance Considerations
1. Introduction
1.1 Overview
The R-Type Server is a dedicated authoritative game server designed to host multiplayer sessions of the R-Type game. It acts as the single source of truth for the game state, ensuring fair play and synchronized experiences across all connected clients.
The server follows a client-server architecture where:
- The server owns and manages all game logic, physics, and state
- Clients send inputs and receive state updates to render the game
1.2 Key Features
| Feature | Description |
|---|---|
| Authoritative Game State | Server validates all actions, preventing cheating |
| Multi-Lobby Support | Multiple concurrent game sessions with isolation |
| Player Authentication | Account system with login/register functionality |
| Persistent Progression | Score tracking and leaderboard via database |
| Remote Administration | RCON system for server management |
| Configurable Gameplay | Wave difficulty and enemy patterns via config files |
| Scalable Threading | Thread pool for concurrent game instances |
1.3 System Requirements
- OS: Linux
- Network: UDP port availability (configurable)
- Storage: SQLite database for account persistence
- Memory: Scales with number of concurrent lobbies
1.4 High-Level Architecture

2. Quick Start
2.1 Compilation
Build the server using the project’s Makefile:
# Debug build
make server

# Release build
make release
The compiled binary will be available as r-type_server in the project root.
2.2 Server Launch
The server requires a port to be specified at launch:
./r-type_server -p <port> [-t <tickrate>] [-d]
| Argument | Required | Description | Default |
|---|---|---|---|
-p <port> | Yes | UDP port to listen on | - |
-t <tickrate> | No | Game updates per second (1-120) | 60 |
-d | No | Enable debug logging | Disabled |
Examples:
# Start server on port 4242 with default settings
./r-type_server -p 4242

# Start with 30 tick rate and debug logging
./r-type_server -p 4242 -t 30 -d

# Production setup with 120 ticks
./r-type_server -p 8080 -t 120
2.3 Verifying Server Status
On successful startup, the server will:
- Load or generate the RCON configuration
- Initialize the account database
- Begin listening for client connections
- Display the listening port in logs
Use the RCON client to verify the server is responding (see Administration).
3. General Architecture
3.1 Modular Design
The server is built with a modular architecture, separating concerns into distinct layers:
┌─────────────────────────────────────────────────────────┐
│                    Presentation Layer                   │
│              (Packet Serialization/Parsing)             │
├─────────────────────────────────────────────────────────┤
│                    Application Layer                    │
│         (Executors, Lobby Manager, Game Logic)          │
├─────────────────────────────────────────────────────────┤
│                     Domain Layer                        │
│            (ECS, Entities, Components, Systems)         │
├─────────────────────────────────────────────────────────┤
│                  Infrastructure Layer                   │
│           (Network, Database, Configuration)            │
└─────────────────────────────────────────────────────────┘
3.2 Core Modules
| Module | Responsibility |
|---|---|
| RType | Application entry point, initialization orchestrator |
| RTypeServer | Network server, client lifecycle management |
| LobbyManager | Lobby creation, joining, and lifecycle |
| Game | Game session logic, tick loop, win/lose conditions |
| Registry (ECS) | Entity and component storage, system execution |
| AccountDatabase | Persistent storage for accounts and scores |
| ThreadPool | Concurrent game execution management |
3.3 Data Flow
The server processes data through a well-defined pipeline:
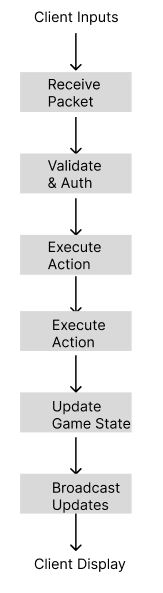
Flow Description:
- Receive: Network layer receives UDP/TCP packets from clients
- Validate: Packet executor checks authentication and permissions
- Execute: Action is processed (input, lobby action, etc.)
- Update: Game state is modified in the ECS registry
- Broadcast: State changes are sent to all relevant clients
4. Connection Management
4.1 Client Lifecycle
A client goes through several states during its connection to the server:
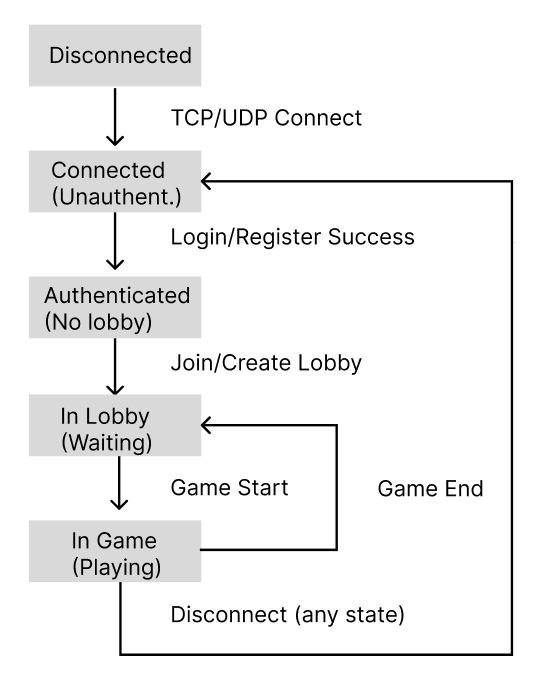
4.2 Authentication System
The server implements a two-phase authentication:
Phase 1 - Whitelist Mode (Unauthenticated)
Before authentication, clients can only send:
- Login requests
- Registration requests
- RCON commands (with valid key)
All other packets are rejected.
Phase 2 - Full Access (Authenticated)
After successful login, clients gain access to:
- Lobby operations (create, join, leave)
- Game actions (start, input, chat)
- Score updates
4.3 Authentication Flow
4.4 Disconnection Handling
When a client disconnects (gracefully or unexpectedly):
- Player Removal: Removed from current lobby
- Entity Cleanup: Player entity destroyed in ECS (if in game)
- Notification: Other players notified via destroy packet
- Resource Cleanup: Network resources freed
The server handles abrupt disconnections through timeout detection.
5. Lobby System
5.1 Concept
Lobbies are isolated waiting rooms where players gather before starting a game. Each lobby:
- Has a unique 6-character identifier
- Can hold 1 to 5 players
- Operates independently from other lobbies
- Owns its game instance when playing
5.2 Lobby Types
| Type | Visibility | Join Method | Use Case |
|---|---|---|---|
| Public | Listed | Auto-matchmaking | Quick play with strangers |
| Private | Hidden | Code sharing | Playing with friends |
Lobby Code Format:
Valid characters: 1-9, a-z, A-Z
Example: "K7MN2P"
5.3 Lobby Lifecycle
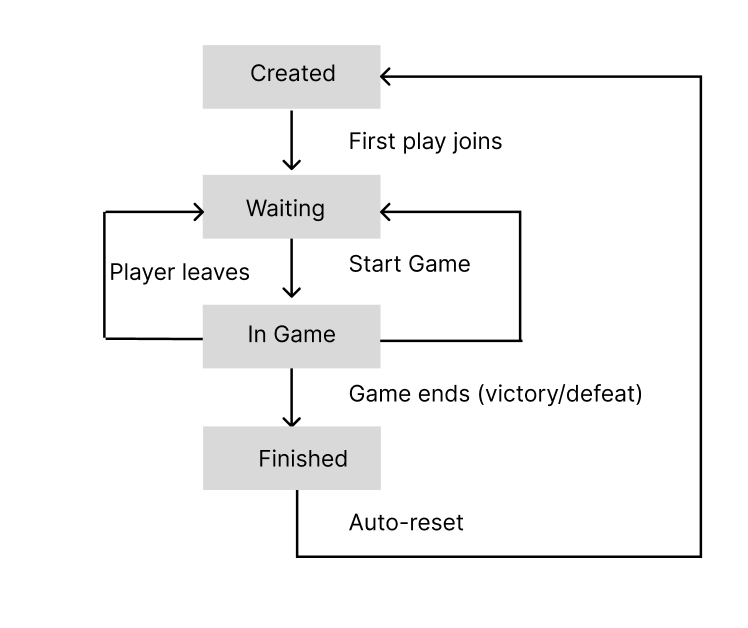
5.4 Player Management
Joining a Lobby:
Player Request              Server Action

Join Public       ────>     Find/create public lobby with space
Join Private      ────>     Create new private lobby, return code
Join with Code    ────>     Find lobby by code, verify space
Leaving a Lobby:
- During waiting: Player removed, others notified
- During game: Player entity destroyed, game continues
- Last player leaves: Lobby destroyed (if empty)
5.5 Constraints
| Constraint | Value | Reason |
|---|---|---|
| Min players | 1 | Single-player allowed |
| Max players | 5 | Game balance, network bandwidth |
| Code length | 6 | Collision avoidance, easy sharing |
6. Game Loop
6.1 Tick Rate System
The server operates on a fixed timestep model:
Tick Rate: Number of game updates per second
Default: 60 ticks/second = 16.67ms per tick
Range: 1-120 ticks/second
Why Fixed Timestep?
- Deterministic physics simulation
- Consistent gameplay across different hardware
- Predictable network update frequency
6.2 Tick Execution Order
Each tick follows a precise execution order:
                      TICK START:

  1. Time Synchronization
     - Send current server time to all clients

  2. Network Flush
     - Send all queued packets from previous tick

  3. ECS Systems Update
     - Position System (velocity → position)
     - Pattern System (enemy patterns)
     - Collision System (hitbox detection)
     - Health System (damage application)
     - Boundary System (out-of-bounds cleanup)

  4. Gameplay Update
     - Wave management (spawn enemies)
     - Win/Lose condition check
     - Score updates

  5. State Broadcast
     - Position updates for moved entities
     - Destroy packets for dead entities
     - New entity packets for spawns

  6. Wait for Next Tick
     - Sleep until tick duration elapsed

                       TICK END
6.3 Wave System
Games progress through configurable waves of increasing difficulty:
Wave Properties:
- Difficulty level
- Enemy count and types
- Boss configuration (HP, patterns, size)
- Wait time between waves
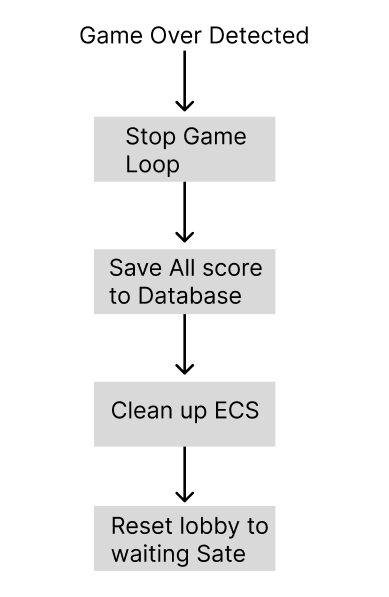
6.4 Win/Lose Conditions
| Condition | Trigger | Result |
|---|---|---|
| Victory | All waves completed | Scores saved, return to lobby |
| Defeat | All players dead | Scores saved, return to lobby |
6.5 End Game Flow
7. Entity Component System (ECS)
7.1 Overview
The server uses an Entity Component System architecture for game object management. This pattern provides:
- Performance: Cache-friendly data layouts
- Flexibility: Compose behaviors through components
- Maintainability: Decoupled systems and data
7.2 Server-Managed Entities
| Entity Type | Description | Authority |
|---|---|---|
| Player | Human-controlled spaceship | Server (validates inputs) |
| Laser | Player projectile | Server (spawned on input) |
| Enemy | AI-controlled hostile | Server (full control) |
| Boss | Large enemy with patterns | Server (full control) |
| Boss Bullet | Enemy projectile | Server (pattern-based) |
7.3 Component Catalog
Transform Components:
| Component | Data | Purpose |
|---|---|---|
| Position | x, y coordinates | Entity location in world |
| Velocity | dx, dy values | Movement speed and direction |
| Acceleration | ax, ay values | Velocity change over time |
Combat Components:
| Component | Data | Purpose |
|---|---|---|
| Health | current, max HP | Damage tracking |
| HitBox | width, height | Collision boundaries |
| Damager | damage value | Damage dealt on contact |
| Resistance | reduction % | Damage mitigation |
| Hitable | flag | Can receive damage |
Behavior Components:
| Component | Data | Purpose |
|---|---|---|
| Pattern | pattern type, params | Enemy movement/attack pattern |
| Tag | entity type enum | Entity classification |
| Dependence | parent entity ID | Lifecycle linking |
| OutsideBoundaries | flag | Cleanup when off-screen |
7.4 System Execution Pipeline
Systems run in a specific order each tick:
                 System Execution Order

  1. POSITION SYSTEM
     Input:  Velocity, Acceleration, Position
     Output: Updated Position

  2. PATTERN SYSTEM
     Input:  Pattern, Position
     Output: Updated enemies positions

  3. LASER SYSTEM
     Input:  Laser, Position
     Output: Updated laser entities
     Logic:  Move lasers, check lifetime

  4. COLLISION SYSTEM
     Input:  Position, HitBox, Hitable
     Output: Collision events
     Logic:  AABB intersection detection

  5. HEALTH SYSTEM
     Input:  Health, Collision events, Damager
     Output: Updated Health, Death events
     Logic:  Apply damage, check death

  6. LOOSE SYSTEM
     Input:  Player entities, Health
     Output: Game over flag
     Logic:  Check if all players dead
7.5 Entity Factories
Factories ensure consistent entity creation:
Player Factory:
Creates: Player entity + associated Laser entity
Components: Position, Health, HitBox, Tag, Laser reference
Boss Factory:
Creates: Boss entity with configured stats
Components: Position, Health (from config), HitBox (from config),
            Pattern, Damager, Velocity
Bullet Factory:
Creates: Projectile with pattern-based movement
Components: Position, Velocity, Damager, HitBox, OutsideBoundaries
8. Threading Model
8.1 Thread Architecture
The server uses a multi-threaded architecture to handle concurrent operations:
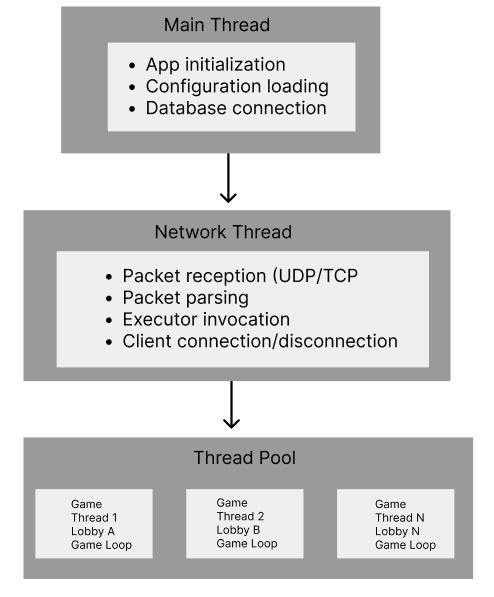
8.2 Thread Responsibilities
| Thread | Responsibility | Blocking Allowed |
|---|---|---|
| Main | Init, shutdown, signals | No |
| Network | I/O, packet routing | Yes (I/O wait) |
| Game (pool) | Game loop, ECS update | Yes (tick sleep) |
8.3 Game Isolation
Each game runs in complete isolation:
Benefits:
- Game A crash doesn’t affect Game B
- No synchronization needed between games
- Performance gain
8.4 Synchronization Mechanisms
Critical sections protected by mutexes:
| Mutex | Protects | Contention Level |
|---|---|---|
_playersMutex | Player list in lobby | Medium |
_registryMutex | ECS registry access | High (in-game) |
_lobbiesMutex | Lobby collection | Low |
_runningMutex | Game running state | Low |
Best Practices Applied:
- Minimize critical section duration
- Avoid nested locks (deadlock prevention)
- Use RAII lock guards
9. Configuration
9.1 Gameplay Configuration
File: ./server/config.cfg
Defines wave progression and difficulty:
┌─────────────────────────────────────────────────────────────┐
│                      config.cfg                             │
├─────────────────────────────────────────────────────────────┤
│                                                             │
│  waves = (                                                  │
│    {                                                        │
│      difficulty = 1                                         │
│      pattern = "SPIRAL"                                     │
│      boss_hp = 100                                          │
│      boss_size = { width = 64, height = 64 }                │
│      enemy_count = 5                                        │
│      wait_time = 3.0                                        │
│    },                                                       │
│    {                                                        │
│      difficulty = 2                                         │
│      pattern = "RADIAL_BURST"                               │
│      ...                                                    │
│    },                                                       │
│    ...                                                      │
│  )                                                          │
│                                                             │
└─────────────────────────────────────────────────────────────┘
9.2 Wave Parameters
| Parameter | Type | Description |
|---|---|---|
difficulty | Integer | Difficulty multiplier (1-3+) |
pattern | String | Enemy attack pattern |
boss_hp | Integer | Boss health points |
boss_size | Object | Boss hitbox dimensions |
boss_damage | Integer | Damage dealt by boss |
boss_speed | Float | Boss movement speed |
enemy_count | Integer | Number of enemies in wave |
wait_time | Float | Seconds before wave starts |
9.3 Available Patterns
| Pattern | Behavior |
|---|---|
SPIRAL | Bullets spiral outward |
RADIAL_BURST | Bullets explode in all directions |
AIMED_SHOT | Bullets target player position |
WAVE_SPREAD | Bullets in wave formation |
FLOWER | Flower-shaped bullet pattern |
DOUBLE_SPIRAL | Two interleaved spirals |
10. Administration (RCON)
10.1 Overview
RCON (Remote Console) allows administrators to manage the server without direct access.
10.2 Authentication
RCON uses a shared secret authentication:
- Server generates
RCON_KEYon first startup - Key stored in
rtype.cfg - Admin must provide key with each command
- Invalid key = command rejected
10.3 Available Commands
| Command | Syntax | Description |
|---|---|---|
LIST | LIST | Show all connected players |
KICK | KICK <username> | Disconnect a player immediately |
BAN | BAN <username> | Ban account (prevents future logins) |
UNBAN | UNBAN <username> | Remove ban from account |
BANLIST | BANLIST | List all banned accounts |
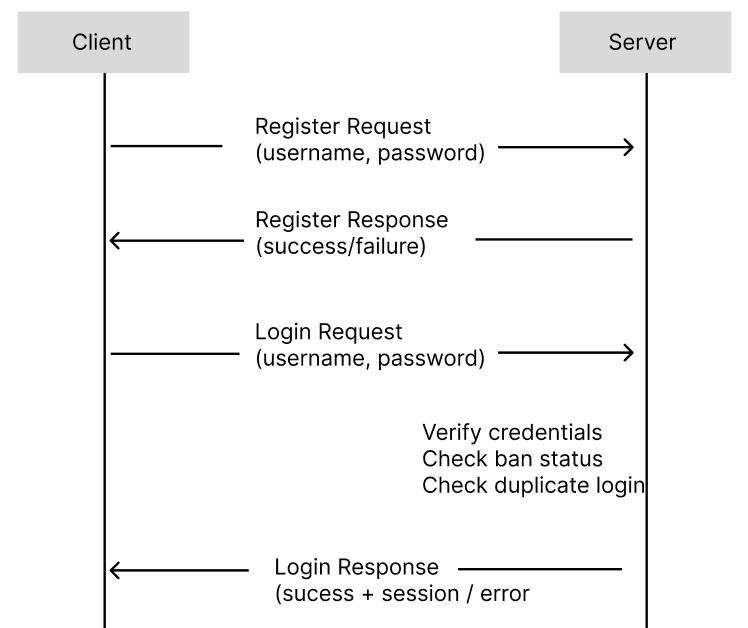
11. Login/Registration
12. Error Handling
12.1 Logging System
Debug Mode (-d flag) enables verbose logging:
[TIMESTAMP] [MODULE] Message
─────────────────────────────────────
[12:34:56] [NETWORK]    Client connected: 192.168.1.10
12.2 Graceful Degradation
| Scenario | Server Response |
|---|---|
| Client timeout | Remove from lobby, notify others |
| Database unavailable | Reject new registrations, allow cached logins |
| Game thread crash | Terminate lobby, preserve other games |
| Invalid packet | Ignore, log warning |
13. Performance Considerations
13.1 Scalability
Horizontal Scaling (Lobbies):
Factors limiting concurrent lobbies:
- Available CPU threads
- Memory per game instance
- Network bandwidth
13.2 Network Optimization
Packet Batching:
Instead of sending immediately, packets are queued and flushed once per tick:
Benefits:
- Reduced packet overhead
- Better bandwidth utilization
- Predictable network load
See Also
- Network Protocol (RFC) - Detailed packet specifications
- Client Documentation - Client-side architecture
- ECS Development Guide - Working with the ECS framework
Network Documentation (a.k.a RéseauType)
Summary
RéseauType is the network library used by both the client and the server, written in C++.
Being developed by our own, it provides a high abstraction of common network utils, and makes communication easy and reliable.
RéseauType allows server-client communication by Packet.
Packets are defined inside the library, and are shared by both the server and client, in order for them to be synchronised.
Developers, who wish to use this library, can add any sort of datas to packets, including strings.
Every sent packet is being serialised, compressed with zlib, converted into network byte order, and transmited in binary.
Those packets can either be transmitted through UDP, or TCP, depending on the implemented type of packet.
RéseauType supports multi-threading, and such without having a timeout on poll (unnecessary loops).
RéseauType sockets are non-blocking.
RéseauType client converts received packet from network byte order into its own endianness.
RéseauType, with its own Client and Server implementation, is able to match a TCP Client to an UDP Client, and recognise them as a single entity and same entity. This demonstrate RéseauType’s high network abstraction.
RéseauType comes with its own logging packet system, logging every received and sent packet. The logging can be toggled by setting Logger:shouldLog to true
Architecture
RéseauType is composed of five parts:
- Packets Packets are the data being sent from the server to the clients and vice-versa. Serialised in binary, and compressed, those can be sent either via TCP or UDP.
- The Server Creates & starts a RéseauType server (TCP/UDP) that can automatically write, receive, and execute packets.
- The Client Creates a client to connect to a RéseauType server (TCP/UDP). It can send, receive, and execute incoming packets from the server. It can also calculate its own PacketLoss.
- PollManager PollManager is being used by both the client and server. It is a generic part of RéseauType, which allows to accept connections, read packets, send packets, and handle disconnections.
- Packet Executors
RéseauType’s Packet Executors allow you to run specific code when receiving a particular packet type.
These can be added to both the
Clientor theServer.
Packets
A packet is a serialisable data structure that can be sent between the client and the server using either TCP or UDP. Each packet has an ID, can have a variadic size, and withholds datas. A packet does not have a direction, and can be sent by both the server and the client. The server and the client needs to handle individually their own behavior on receiving a packet using Packet Executors
Developer’s Packet Definition (How to create your own packet)
Each created packet must implement the Packet class.
ID
First and foremost, a packet needs a unique ID, which cannot exceed the length of a uint8_t.
This ID must be set using the herited Packet constructor.
class ExamplePacket : public Packet {
public:
   ExamplePacket(uint32_t uuid=0) : Packet(PacketId::S_AUTHENTICATION_PACKET) {
        this->uuid = uuid;
    }
};
/!: DO NOT USE A SAME ID FOR TWO PACKETS, IT IS AN UNDEFINED BEHAVIOR. You are free to set a custom constructor for each of your packets. However, you MUST ensure your packet can be instantiated without any constructor arguments.
Serialisation & Unserialisation
A packet is supposed to send one or multiple datas as a single packet. Therefore, you NEED to implement the two following methods:
void serialize() {
   /* Serialisation code goes here */
}

void unserialize() {
   /* Unerialisation code goes here */
}
serialize() is the function called to send the packet.
On the other hand, unserialize is the function being called to turn a serialised binary data into the original Packet
If the packet had to send in order:
- An integer, called
meow. - A double, called
woof - Yet another integer, called
uwu
This is how the serialize() function MUST be implemented:
class ExamplePacket : public Packet {
public:
   /* [...] Constructor with Packet's ID definition */

   void serialize() {
      this->write(meow);
      this->write(woof);
      this->write(uwu);
   }
private:
   int meow = 69;
   double woof = 727.420;
   int uwu = 67;
};
The write function is a pre-implemented Packet method and allows for data types to be easily written.
As a result, our packet upon sending, will send in order the value of meow, woof, then finally uwu.
However, if our packet can be sent, it still can not be converted back into our original packet as we did not implement the unserialise() method.
This is how the unserialise() function MUST be implemented:
class ExamplePacket : public Packet {
public:
   /* [...] Constructor with Packet's ID definition */

   void serialize() {
      this->write(meow);
      this->write(woof);
      this->write(uwu);
   }

   void unserialize() {
      this->read(meow);
      this->read(woof);
      this->read(uwu);
   }
private:
   int meow = 69;
   double woof = 727.420;
   int uwu = 67;
};
The read function is a pre-implemented Packet method and allows for data types to be easily read.
As a result, our packet upon receiving, will read in order the value of meow, woof, then finally uwu, which MUST be in the same order that they were serialized.
meow, woof and uwu’s value will then be set to their corresponding received values.
Name
This only serves for the Logger and as an identifier for the user. Each packet must specify its packet name by implementing the following method:
const std::string getName() {
   return "ExamplePacket";
}
Mode
This indicates if the packet should be sent using TCP or UDP to the target.
enum PacketMode getMode() const {
   return PacketMode::TCP;
}
or
enum PacketMode getMode() const {
   return PacketMode::UDP;
}
Display
Each packet needs to implement a display method and displays all of its value inside for the logger to display them.
If we had to take our ExamplePacket, this would be a way to implement that method:
PacketDisplay display() const
{
   return {"meow", this->meow, "woof", this->woof, "uwu", this->uwu};
}
which would print all of the received values the following way
{meow=69, woof=727.420, uwu=67}
The returned PacketDisplay must always have a key affiliated with a value or its an undefined behavior.
Clone
This is a repetitive method that should be implemented in every packet as a way for the user to be able to clone a packet if needed.
std::shared_ptr<Packet> clone() const {
   return make_copy(ExamplePacket);
}
simply return make_copy and use as a parameter the class name of the Packet.
Packet’s Registering
After implementing your own packet, you will need to register your packet.
For doing such process, you will need to add it to the PacketManager class.
This will register the packet in both the client and server, and will be able to be used.
On the PacketManager’s registerPackets method, simply add a line
this->packets.push_back(std::make_shared<ExamplePacket>());
And our packet can now be used by the server and client easily !
The Server
The Server is RéseauType’s core component that handles both TCP and UDP connections. It manages client connections, receives, sends packets, and can execute packet handlers automatically.
Server’s Definition
You need to create your own server by implementing the Server class, and the three following functions:
virtual std::shared_ptr<IPollable> createClient(int fd) = 0;
virtual void onClientConnect(std::shared_ptr<IPollable> client) = 0;
virtual void onClientDisconnect(std::shared_ptr<IPollable> client) = 0;
onClientConnectwill be invoked when a client connects to the server.onClientDisconnectwill be invoked when a client disconnects from the server.createClientis the way you want clients to be created (if you wish to use a custom class). However, it is best if it implements ServerClient rather than IPollable (which itself already implements IPollable and does more things)
If you do not wish to create your own Server class and make it implement Server class, you can use the default CustomServer on the library, which is defined the following way:
class CustomServer : public Server {
    public:
        CustomServer(int port) : Server(port) {
            return;
        }

        std::shared_ptr<IPollable> createClient(int fd) {
            return std::make_shared<ServerClient>(fd, *this);
        }

        void onClientConnect(std::shared_ptr<IPollable> client) {
            LOG("Client [" << client->getFileDescriptor() << "] connected !");
        }

        void onClientDisconnect(std::shared_ptr<IPollable> client) {
            LOG("Client [" << client->getFileDescriptor() << "] disconnected !");
        }
};
Server’s methods
up()
Starts the server on the specified port. Creates both TCP and UDP sockets, and begins listening for connections.
Returns true if the server started successfully, false otherwise.
down()
Stops the server. Shuts down both TCP and UDP sockets, clears all connections, and removes all packet executors.
Returns true if the server stopped successfully, false otherwise.
isUp()
Returns true if the server is currently running, false otherwise.
loop()
Main server loop that handles all network operations:
- Sends UDP packets
- Polls for socket events
- Handles client disconnections
- Executes received packets
This method MUST be called repeatedly while the server is running.
getPacketListener()
Returns the server’s packet listener, which allows you to add packet executors for handling received packets.
getPollManager()
Returns the server’s poll manager, which handles all socket polling and connection management.
getMaxConnections()
Returns the maximum number of simultaneous connections the server can handle.
Server’s Client
A connected client is a Pollable.
Although, a Pollable is not necessarily a client
The base pollable class for server clients is ServerClient.
This class provides a sendPacket() method to send a packet to a connected client.
Server’s UDP Authentication
When a client connects to the server via TCP, the server generates a unique UUID and sends it to the client using a SAuthentificationPacket.
The server then waits to receive this UUID back from the client via UDP through a CAuthentificationPacket.
Once received, the server binds the TCP and UDP connections together, recognizing them as a single client entity.
After successful authentication, the server sends an AuthentifiedPacket to the client on the TCP connection to confirm the authentication was successful.
Only then can the client and server exchange UDP packets.
The Client
The Client is RéseauType’s component that connects to a server using both TCP and UDP. It handles connection establishment, packet sending and receiving, and executes packet handlers automatically.
Client’s methods
connect()
Connects the client to the server at the specified IP and port.
Creates both TCP and UDP sockets and establishes connections
Returns true if the connection was successful, false otherwise.
disconnect()
Disconnects the client from the server.
Closes both TCP and UDP sockets
Clears all connections, and removes all packet executors.
Returns true if the disconnection was successful.
isConnected()
Returns true if the client is currently connected to the server, false otherwise.
sendPacket()
Sends a packet to the server. The packet will be sent through TCP or UDP depending on its mode.
loop()
Main client loop that handles all network operations:
- Sends UDP packets
- Polls for socket events
- Executes received packets.
This method MUST be called repeatedly while the client is connected.
getPacketListener()
Returns the client’s packet listener, which allows you to add packet executors for handling received packets.
getPollManager()
Returns the client’s poll manager, which handles all socket polling and connection management.
getIp()
Returns the server’s IP address the client is connected to.
getPort()
Returns the server’s port the client is connected to.
isAuthentified()
Returns true if the client has been authenticated by the server, false otherwise.
getUUID()
Returns the unique identifier assigned to this client by the server.
Client’s UDP Authentication
When the client connects to the server via TCP, it receives a SAuthentificationPacket which contains an UUID.
The client sends this UUID to the server via UDP using a CAuthentificationPacket.
This process binds the TCP and UDP connections together, allowing the server to recognize them as a single client.
If this authentication fails, the client cannot send or receive any UDP packets.
The client will retry sending the CAuthentificationPacket up to 10 times.
The client only knows if it has been successfully authenticated when it receives an AuthentifiedPacket from the server on the TCP end.
PollManager
The PollManager is RéseauType’s component that handles socket polling and connection management. It is used by both the server and the client to manage all active connections and poll for network events.
Overexplaining this component is not useful, as it is made to never be edited.
PollManager’s methods
addPollable()
Adds a new pollable connection to the manager.
removePollable()
Removes a pollable connection by its file descriptor. Closes the socket and returns the removed pollable.
removePollables()
Removes multiple pollable connections at once. Returns a vector of the removed pollables.
updateFlags()
Updates the polling flags for a specific file descriptor.
getConnectionCount()
Returns the total number of active connections. (This sadly includes more than the number of connected clients to the server and needs to be changed).
getPool()
Returns all active the active pollable connections.
getPollableByAddress()
Returns a pollable connection by its network address. Returns nullptr if not found.
pollSockets()
Polls all registered sockets for events. Takes an optional timeout in milliseconds. Returns a vector of pollables that disconnected during the poll.
wakeUp()
Wakes up the poll if it is currently blocking (useful for multi-threading purposes).
clear()
Removes all pollables and closes all sockets. Called when shutting down either the server or client.
Packet Executors
Packet Executors allow you to run specific code when receiving a particular packet type. They are event handlers that get triggered automatically when a packet is received by the server or client.
In order to explain them properly, we will take as an example the following case:
We want to print on the console "meow !!! :3 >\\< {uwu}" if ExamplePacket was being sent
{uwu} being the uwu value of the ExamplePacket which can be retrieved using a int getUwU() const; method.
Packet Executor’s Server Implementation
Each Server’s executor must implement the PacketExecutorImplServer class
PacketExecutorImplServer class is a template class that takes two dynamic types : The first one being the type of packet of the executor (in our case, ExamplePacket) and the second being the type of the client that will send us the packet (in our case ServerClient (which is the default))
class AwesomeExamplePacketExecutor : public PacketExecutorImplServer<ExamplePacket, ServerClient> {
   /* Code.... */
};
A class that implements PacketExecutorImplServer must define two methods : an execute(...) and a getPacketId()
getPacketId() is the ID of the packet that will be catched (ExamplePacket in our example)
execute(....) is the method that will be called when receiving an ExamplePacket
Those two functions when implemented looks like the following:
class AwesomeExamplePacketExecutor : public PacketExecutorImplServer<ExamplePacket, ServerClient> {
   bool execute(Server &srv, std::shared_ptr<ServerClient> con, std::shared_ptr<ExamplePacket> packet) {
      /* Code */
      return true;
   }

    int getPacketId() const {
        return PacketId::NEW_PLAYER;
    }
};
The execute function takes:
- As a first parameter, the
Server. - As a second parameter, a
shared_ptrof the specified Client Class. - And at last, a
shared_ptrof the received packet
The return type of execute determines whether the client should be disconnected or no.
As execute is the function being called when an ExamplePacket is being received, we only need to write what we had to write on the console the following way:
bool execute(Server &srv, std::shared_ptr<ServerClient> con, std::shared_ptr<ExamplePacket> packet) {
   (void) srv;
   (void) con;
   std::cout << "meow !!! :3 >\\< " << packet.getUwU() << std::endl;
   return true;
}
Packet Executor’s Client Implementation
Each Client’s executor must implement the PacketExecutorImplClient class
PacketExecutorImplClient class is a template class that takes two dynamic types : The first one being the type of packet of the executor (in our case, ExamplePacket) and the second being the type of the client that will send us the packet (which MUST always be ClientPollable)
P.S: This second forced parameter will be removed in an soon upcoming update.
class AwesomeExamplePacketExecutor : public PacketExecutorImplClient<ExamplePacket, ClientPollable> {
   /* Code.... */
};
A class that implements PacketExecutorImplClient must define two methods : an execute(...) and a getPacketId()
getPacketId() is the ID of the packet that will be catched (ExamplePacket in our example)
execute(....) is the method that will be called when receiving an ExamplePacket
Those two functions when implemented looks like the following:
class AwesomeExamplePacketExecutor : public PacketExecutorImplClient<ExamplePacket, ClientPollable> {
   bool execute(Client &cl, std::shared_ptr<ClientPollable> con, std::shared_ptr<ExamplePacket> packet) {
      /* Code */
      return true;
   }

    int getPacketId() const {
        return PacketId::NEW_PLAYER;
    }
};
The execute function takes:
- As a first parameter, the
Client. - As a second parameter, a
shared_ptrof the specified Client Class. - And at last, a
shared_ptrof the received packet
The return type of execute determines whether the client should be disconnected or no.
As execute is the function being called when an ExamplePacket is being received, we only need to write what we had to write on the console the following way:
bool execute(Server &srv, std::shared_ptr<ServerClient> con, std::shared_ptr<ExamplePacket> packet) {
   (void) srv;
   (void) con;
   std::cout << "meow !!! :3 >\\< " << packet.getUwU() << std::endl;
   return true;
}
ECS Usage Guide
An Entity Component System works with 3 types :
- Entities
- Components
- Systems
A Component is a small storage structure.
It should define a single component out of a more complex set, representing an Entity.
As said, an Entity is represented by a set of components, which can be dynamically modified.
And a System is something that you would apply on all entities satisfying certain Components, to allow for modification, rendering, …
For example, if you have a component Position and Velocity, you could have a System to update the Position based on the Velocity, and a lot of very different entities could end up with those components and be moved by the same System.
The goal is to separate every actions, and to maximize performances.
Basic usage
- Define Components Components are simple data structures.
struct Position {
    int x;
    int y;
};
- Create Systems
Systems are functions that process components.
void logging_system(Registry& r,
    containers::indexed_zipper<SparseArray<Position>,
                               SparseArray<Velocity>> zipper)
{
    for (auto&& [i, pos, vel] : zipper)
        std::cerr << i << ": Position = { " << pos.value().x << ", "
                  << pos.value().y << " }" << std ::endl;
        std::cerr << i << ": Velocity = { " << vel->x << ", "
                  << vel->y << " }" << std ::endl;
}
- Setup Registry
The registry holds the ECS.
Registry r;
r.register_component<Position>();
r.register_component<Velocity>();
- Create Entities
Entity player = r.spawn_entity();
- Add Components to Entities
r.emplace_component<Position>(player, 2, 23);
r.emplace_component<Velocity>(player, 1, 0);
- Register and Run Systems
r.add_{render/update}_system<Position, Velocity>(logging_system);
r.{render/update}();
- Cleanup
r.kill_entity(player);
Complete Example
See the file ecs/ecs_exemple.cpp
Iterating Over Components
Use zipper to iterate over multiple component arrays:
// With index
for (auto&& [i, pos, vel] : containers::indexed_zipper(positions, velocities)) {
    // i is the entity ID
}
Passing more parameters to systems
You can simply add more parameters to systems when registering them.
void system([[maybe_unused]] Registry &r,
    [[maybe_unused]] containers::indexed_zipper<SparseArray<Position>> zipper,
    int bonus_parameter)
{
    std::cout << "Int value=" << bonus_parameter << std::endl;
}

// Inside function to register systems
registry.add_render_system<Position>(12); // 12 will be passed as bonus_parameter
Graphical Library
Graphical Library
Restrictions
The Graphical Library imposes restrictions.
- All methods must be called in a single Thread.
- The
initmethod must be called before any other method. - The
deinitmethod must be called before the object is deconstructed.
Usage
Rectangle
In order to draw a rectangle, you need to create a Rectangle object, and then call the draw method with that rectangle.
You can specify three parameters.
- The on-screen position with
position, as aWorldPositionobject. - The on-screen size with
size, as aVector2uiobject. - The color with
color.
Text
In order to draw text on screen, you need to create a Text object, and then call the draw method with that text.
To help center the text, you can use the getTextWidth method to get the width of the text in on-screen pixels, using either a Text object, or just plain text with a fontSize.
You cannot change the text font.
You can choose the text, it’s on-screen position, font size and color.
Images
Images are called Textures.
Textures are referenced by name as a std::string.
The best way to use Textures is to register them using the registerTexture method, by specifying a path to the texture file, and a name to reference it ; then to load all textures with loadAllTextures at a specified time.
This way, you will have a lag at the loading time, but not in random state change. You could load all textures in a dedicated “Loading” screen for example.
If you prefer, you can load a single texture instantly using the loadTexture method.
You can get a loaded texture through the getTexture method.
You can render a Texture object via the draw method.
To position the texture to draw, modify a copy of the Texture object.
You have write access to :
- The
scaleattribute, to scale up or down the texture. 1.0 is the default scale. - The
posattribute, to set the on-screen position. - The
rotationattribyte, to set the rotation in degrees.
You have read access to :
- The
pathattribute, specifying the texture file path. - The
nameattribute, specifying the texture reference name. - The
sizeattribute, specifying the on-screen size for a scale of 1.
Sound
Like textures, sound can be registered for loading, or loaded directly following similar conventions.
You only have read access on the Sound object, allowing the reading of the file path and reference name.
A sound is played using the play method.
Events
Events are used to know if a key is pressed, down or just up.
You can register a list of events with the registerEvent method.
Events are referenced by name in the form of a std::string.
If you want to deactivate an event, bind it to the gl::Key::UNDEFINED key.
You can re-bind events using the bindKey method.
If the key bound to an event was pressed in the current frame but not in the precedent frame, the isEventStart method should yield true.
If the key bound to an event is currently pressed, the isEventActive method should yield true.
In other cases, or if the event is deactivated, the isEvent{Start,Active} methods should yield false.
Render loop
The render loop should be implemented at a higher order.
If the window was closed, the should_close method returns true.
You should not call any methods other than end_frame or deinit in this case.
Any render methods should be called between the call of start_new_frame and end_frame.
A typical implementation would be like the following :
gl.init();
/*
Register events
Register textures
Register sounds
*/
gl.loadEverything();
while (!gl.should_close()) {
    gl.start_new_frame(gl::BLACK);
    /*
    Drawing code here
    */
    gl.end_frame();
}
gl.deinit();
Miscellaneous
When using textures and sound, we recommand using the loadEverything method, loading both registered textures and sounds.
If you need to get the window size, use the get_window_size method.
If you need to get the delta time between the last frame, use the getDeltaTime method.
Implementation
An implementation was done using the Raylib library, and can be found in the graphical_library/raylib/ directory.
You can instanciate it in a cpp file using the following :
#include <graphical_library/raylib/Raylib.hpp>

std::make_unique<Raylib>();
Elements
The library features several graphical utilities such as Button, TextBox, InputBox, KeybindSelect, and CheckBox which can be created later on by only using a few parameters like the pos, the size, the color and the action the element needs to apply.
GUI Creation
Using the elements creating new GUIs menu is easier, it can be done by creating a new folder in client/state_machine/states/ using the GUI’s name as folder name.
Once donc you need to add a .ccp and a .hpp using the GUI’s name. then a gui folder containing every elements wanted as .hpp files as well as a file named [GUI's name]Scene.hpp holding every initializations like this->add<Element>().
Then you need to create the scene in your initial hpp and cpp and your GUI is good to go.
For exemple creating a menu which would have a singular button I would create a folder called menu/ containing :
gui/MenuScene.hpp :
#include <graphical_library/raylib/GuiScene.hpp>

class MenuScene : public GuiScene
{
public:
    MenuScene(gl::GraphicalLibrary &gl)
    : GuiScene(gl) {}

    auto init() -> void
    {
        this->add<MenuButton>();
    }
};
gui/MenuButton.hpp :
class MenuButton : public Button
{
public:
    MenuButton()
    : Button()
    {
        this->x = 650;
        this->y = 700;
        this->width = 300;
        this->height = 55;
        this->idleColor = {120, 200, 120, 255};
        this->hoverColor = {180, 255, 180, 255};
        this->pressedColor = {80, 160, 80, 255};
        this->text = "Click me !";
    }
    auto onClick() -> void
    {
        std::cout << "You clicked me !" << std::endl;
    }
};
Menu.hpp :
#include "client/state_machine/State.hpp"

class Menu : public State {
public:
    Menu(ClientManager &cm, Registry &r, Sync &s);

    auto init_systems() -> void;
    auto init_entities() -> void
};
Menu.cpp :
#include "Menu.hpp"
#include <iostream>
#include <memory>
#include "client/manager/ClientManager.hpp"
#include "client/state_machine/State.hpp"
#include "gui/MenuScene.hpp"

Menu::Menu(ClientManager &cm, Registry &r, Sync &s)
    : State(cm, r, s)
{}

auto Menu::init_systems() -> void
{
    std::cout << "Init systems" << std::endl;

    this->guiScene =
        std::make_unique<MenuScene>(this->getGraphicalLibrary(), *this);
    this->guiScene->init();

    this->registry.reset_update_systems();
    this->registry.reset_render_systems();

    this->clientManager.getNetworkManager().resetExecutors();
}